Spring Kafka深入学习分析

本文由来,有一个需求要在浏览器输入Kafka topic,消费组提交后自动开启消费,这个做起来比较简单,同事使用了Kafka 驱动包很快速完成这个。我突然想到能不能通过Spring Kafka自身框架完成这个功能,不使用底层驱动包来自做呢。而引出分析整个Spring Kafka 如何实现注解消费信息,调用方法的。并且最后通过几个简单的代码完成上面小需求。

源码解析

EnableKafka入口

kafka 模块的开始先从@EnableKafka 上@Import(KafkaListenerConfigurationSelector.class)

1
2
3
4
@Override
public String[] selectImports(AnnotationMetadata importingClassMetadata) {
return new String[] { KafkaBootstrapConfiguration.class.getName() };
}

接着继续看下KafkaBootstrapConfiguration类

1
2
3
4
5
6
7
8
9
10
11
12
13
14
15
16
17
18
public class KafkaBootstrapConfiguration implements ImportBeanDefinitionRegistrar {

@Override
public void registerBeanDefinitions(AnnotationMetadata importingClassMetadata, BeanDefinitionRegistry registry) {
if (!registry.containsBeanDefinition(
KafkaListenerConfigUtils.KAFKA_LISTENER_ANNOTATION_PROCESSOR_BEAN_NAME)) {

registry.registerBeanDefinition(KafkaListenerConfigUtils.KAFKA_LISTENER_ANNOTATION_PROCESSOR_BEAN_NAME,
new RootBeanDefinition(KafkaListenerAnnotationBeanPostProcessor.class));
}

if (!registry.containsBeanDefinition(KafkaListenerConfigUtils.KAFKA_LISTENER_ENDPOINT_REGISTRY_BEAN_NAME)) {
registry.registerBeanDefinition(KafkaListenerConfigUtils.KAFKA_LISTENER_ENDPOINT_REGISTRY_BEAN_NAME,
new RootBeanDefinition(KafkaListenerEndpointRegistry.class));
}
}

}

使用BeanDefinitionRegistry 将class 转换成beanDefinition,注册到beanDefinitionMap 容器中,容器会统一将Map Class全部进行实例化,其实就是将这个交给Spring 初始化。
L5hN4I.png

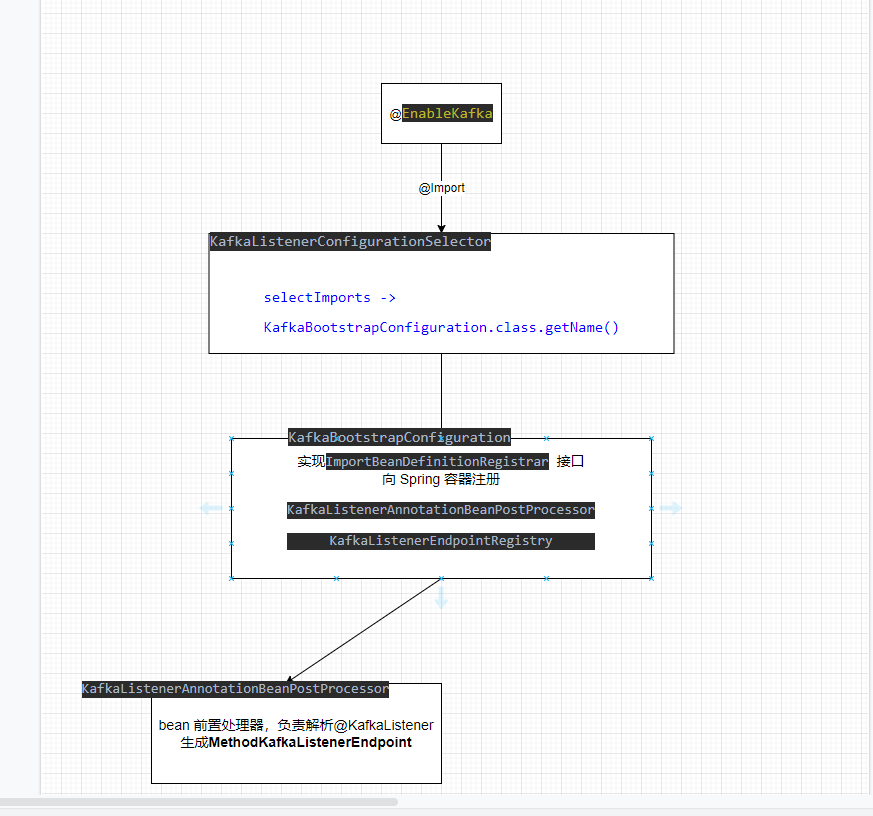
KafkaListenerAnnotationBeanPostProcessor 解析

下面看下kafka核心处理类KafkaListenerAnnotationBeanPostProcessor 如何解析@KafkaListener 注解,postProcessAfterInitialization 在bean 实例化后调用方法,对bean 进行增强。

1
2
3
4
5
6
7
8
9
10
11
12
13
14
15
16
17
18
19
20
21
22
23
24
25
26
27
28
29
30
31
32
33
34
35
36
37
38
39
40
public Object postProcessAfterInitialization(final Object bean, final String beanName) throws BeansException {
if (!this.nonAnnotatedClasses.contains(bean.getClass())) {
//如果此时bean可能是代理类,则获取原始class ,否则直接class
Class<?> targetClass = AopUtils.getTargetClass(bean);
//这时类上去找@KafkaListener ,因为在class 上可能出现多种复杂情况,这个方法封装一系列方法能包装找到注解
//这里可能存在子父类同时使用注解,所有只有找到一个就进行对应方法处理
Collection<KafkaListener> classLevelListeners = findListenerAnnotations(targetClass);
final boolean hasClassLevelListeners = classLevelListeners.size() > 0;
final List<Method> multiMethods = new ArrayList<>();
//从方法上找注解,找到方法放到map中,Method 当作key
Map<Method, Set<KafkaListener>> annotatedMethods = MethodIntrospector.selectMethods(targetClass,
(MethodIntrospector.MetadataLookup<Set<KafkaListener>>) method -> {
Set<KafkaListener> listenerMethods = findListenerAnnotations(method);
return (!listenerMethods.isEmpty() ? listenerMethods : null);
});
if (hasClassLevelListeners) { //如果类上有注解的话,都有搭配@KafkaHandler使用的,方法上找这个注解
Set<Method> methodsWithHandler = MethodIntrospector.selectMethods(targetClass,
(ReflectionUtils.MethodFilter) method ->
AnnotationUtils.findAnnotation(method, KafkaHandler.class) != null);
multiMethods.addAll(methodsWithHandler);
}
if (annotatedMethods.isEmpty()) { //将解析过class 缓存起来
this.nonAnnotatedClasses.add(bean.getClass());
else {
// Non-empty set of methods
for (Map.Entry<Method, Set<KafkaListener>> entry : annotatedMethods.entrySet()) {
Method method = entry.getKey();
for (KafkaListener listener : entry.getValue()) {
processKafkaListener(listener, method, bean, beanName); //方法监听处理的逻辑
}
}
this.logger.debug(() -> annotatedMethods.size() + " @KafkaListener methods processed on bean '"
+ beanName + "': " + annotatedMethods);
}
if (hasClassLevelListeners) {
processMultiMethodListeners(classLevelListeners, multiMethods, bean, beanName); //KafkaHandler 处理逻辑
}
}
return bean;
}

@kafkaListener其实可以作用于Class 上的,搭配着@KafkaHandler一起使用,那怎么样使用呢,我用一个简单例子展示下。

1
2
3
4
5
6
7
8
9
10
11
12
13
@KafkaListener(topics = "${topic-name.lists}",groupId = "${group}",concurrency = 4)
public class Kddk {

@KafkaHandler
public void user(User user){

}

@KafkaHandler
public void std(Dog dog){

}
}

消费信息不同对象区分进行处理,省去对象转换的麻烦,我暂时想到场景就是这些,平常很少有这些。这个实现原理我就不深入分析了

1
2
3
4
5
6
7
8
9
10
11
12
13
14
15
16
17
18
19
20
21
22
23
24
25
26
27
protected void processKafkaListener(KafkaListener kafkaListener, Method method, Object bean, String beanName) {
//如果方法刚好被代理增强了,返回原始class 方法
Method methodToUse = checkProxy(method, bean);
MethodKafkaListenerEndpoint<K, V> endpoint = new MethodKafkaListenerEndpoint<>();
endpoint.setMethod(methodToUse);

String beanRef = kafkaListener.beanRef();
this.listenerScope.addListener(beanRef, bean);
String[] topics = resolveTopics(kafkaListener);
TopicPartitionOffset[] tps = resolveTopicPartitions(kafkaListener);
//这个方法是判断方法上是否有@RetryableTopic 注解,有的话则放回true,注册到KafkaListenerEndpointRegistry
if (!processMainAndRetryListeners(kafkaListener, bean, beanName, methodToUse, endpoint, topics, tps)) {
//解析@kafkaListener 属性,设置到endpoint ,注册到KafkaListenerEndpointRegistry
processListener(endpoint, kafkaListener, bean, beanName, topics, tps);
}
this.listenerScope.removeListener(beanRef);
}

protected void processListener(MethodKafkaListenerEndpoint<?, ?> endpoint, KafkaListener kafkaListener,
Object bean, String beanName, String[] topics, TopicPartitionOffset[] tps) {
processKafkaListenerAnnotationBeforeRegistration(endpoint, kafkaListener, bean, topics, tps);
String containerFactory = resolve(kafkaListener.containerFactory());
KafkaListenerContainerFactory<?> listenerContainerFactory = resolveContainerFactory(kafkaListener, containerFactory, beanName);
//这里主要核心了,解析完成后,注册到KafkaListenerEndpointRegistry 中,等待下一步操作了
this.registrar.registerEndpoint(endpoint, listenerContainerFactory);
processKafkaListenerEndpointAfterRegistration(endpoint, kafkaListener);
}

类名MethodKafkaListenerEndpoint 都可以理解成端点对象,简单地说,端点是通信通道的一端。可以理解这个端点连接业务方法和kafka 信息之间的通信端点。
@RetryableTopic 是spring kafka 2.7 后出的一个注解,主要作用就是在消费kafka信息时出现消费异常时,失败重试而出现死信信息的处理,由于Kafka内部并没有死信队列或者死信信息这类东西。Spring 自己搞出来一个DLT topics (Dead-Letter Topic),意思就是当消费信息失败到达一定次数时,会将信息发送到指定DLT topic 中。注解可以设置重试次数、重试时间、故障异常、失败策略等等。

其实这个processMainAndRetryListeners 方法跟下面processListener 作用差不多,都有解析注解内容,然后调用KafkaListenerEndpointRegistry.registerEndpoint 方法。
KafkaListenerEndpointRegistry 主要由Spring 容器创建,用于实例化MessageListenerContainer
KafkaListenerEndpointRegistrar主要代码new创建,并没有交给spring容器管理,用于帮助bean 注册到KafkaListenerEndpointRegistry中
这个两个类类名特别相似,在分析源码时被搞到晕头转向,分清楚后其实就挺简单了,这个类名搞混上浪费不算时间去理解。

注册endpoint

1
2
3
4
5
6
7
8
9
10
11
12
13
14
15
public void registerEndpoint(KafkaLiEstenerEndpoint endpoint, @Nullable KafkaListenerContainerFactory<?> factory) {
// Factory may be null, we defer the resolution right before actually creating the container
// 这个只是一个内部类,用来装两个对象的,没有任何实现意义,factory 实际可能为空,这里使用延时创建解析这个问题
KafkaListenerEndpointDescriptor descriptor = new KafkaListenerEndpointDescriptor(endpoint, factory);
synchronized (this.endpointDescriptors) {
//这个 startImmediately 并没有被初始化,这里一定是false,当被设置true,会直接创建监听器容器,这时应该是spring 容器已经初始化完成了
if (this.startImmediately) { // Register and start immediately
this.endpointRegistry.registerListenerContainer(descriptor.endpoint,
resolveContainerFactory(descriptor), true);
}
else {
this.endpointDescriptors.add(descriptor);
}
}
}

这里为什么有一个startImmediately开关呢,这里只是将endpoint 放入容器集中保存起来,等到全部添加完成后,使用Spring InitializingBean接口afterPropertiesSet 方法进行基础注册启动,这是利用了Spring bean 生命周期方法来触发,如果是Spring 完全启动完成后,那添加进来endpoint就是不能启动的了,所以相当于一个阈值开关,开启后立即启动。
下面看下调用KafkaListenerEndpointRegistrar.afterPropertiesSet 来开启各大endpoint 运行。

1
2
3
4
5
6
7
8
9
10
11
12
13
14
15
16
17
18
19
20
21
22
23
24
25
26
27
28
29
30
31
32
33
34
35
36
37
38
39
40
@Override
public void afterPropertiesSet() {
registerAllEndpoints();
}

protected void registerAllEndpoints() {
synchronized (this.endpointDescriptors) {
for (KafkaListenerEndpointDescriptor descriptor : this.endpointDescriptors) {
if (descriptor.endpoint instanceof MultiMethodKafkaListenerEndpoint //只有使用@KafkaHandler 才会生成这个对象
&& this.validator != null) {
((MultiMethodKafkaListenerEndpoint) descriptor.endpoint).setValidator(this.validator);
}
//通过endpoint ,containerFactory 创建信息容器MessageListenerContainer
this.endpointRegistry.registerListenerContainer(
descriptor.endpoint, resolveContainerFactory(descriptor));
}
//全部处理完成了,就可以开启start启动按钮,让新增进来立即启动
this.startImmediately = true; // trigger immediate startup
}
}

//获取内部类KafkaListenerContainerFactory 具体实例,在延时启动时,可能存在空,这时可以使用Spring 内部默认
// 如果注解上已经备注了要使用ContainerFactory 则使用自定义,为空则使用默认ConcurrentKafkaListenerContainerFactory
private KafkaListenerContainerFactory<?> resolveContainerFactory(KafkaListenerEndpointDescriptor descriptor) {
if (descriptor.containerFactory != null) {
return descriptor.containerFactory;
}
else if (this.containerFactory != null) {
return this.containerFactory;
}
else if (this.containerFactoryBeanName != null) {
Assert.state(this.beanFactory != null, "BeanFactory must be set to obtain container factory by bean name");
this.containerFactory = this.beanFactory.getBean(
this.containerFactoryBeanName, KafkaListenerContainerFactory.class);
return this.containerFactory; // Consider changing this if live change of the factory is required
}
else {
//.....
}
}

MessageListenerContainer

看下KafkaListenerEndpointRegistry.registerListenerContainer 方法如何生成信息监听器的。

1
2
3
4
5
6
7
8
9
10
11
12
13
14
15
16
17
18
19
20
21
22
23
24
25
26
27
28
29
30
31
32
33
34
35
36
37
38
39
40
41
42
43
44
45
46
47
48
49
50
51
52
53
54
55
56
57
58
59
60
61
public void registerListenerContainer(KafkaListenerEndpoint endpoint, KafkaListenerContainerFactory<?> factory) {
registerListenerContainer(endpoint, factory, false);
}

public void registerListenerContainer(KafkaListenerEndpoint endpoint, KafkaListenerContainerFactory<?> factory,
boolean startImmediately) {
String id = endpoint.getId();
Assert.hasText(id, "Endpoint id must not be empty");
synchronized (this.listenerContainers) {
Assert.state(!this.listenerContainers.containsKey(id),
"Another endpoint is already registered with id '" + id + "'");
//创建监听器容器
MessageListenerContainer container = createListenerContainer(endpoint, factory);
//使用map 将实例化容器保存起来,key就是 @KafkaListener id ,这个就是所谓的beanName
this.listenerContainers.put(id, container);
ConfigurableApplicationContext appContext = this.applicationContext;
String groupName = endpoint.getGroup();
//如果注解中有设置自定义监听组,这时需要获取到监听组实例,将监听器容器装起来
if (StringUtils.hasText(groupName) && appContext != null) {
//省略部分内容
}
if (startImmediately) { //如果是立即启动,这时需要手动调用监听器start 方法
startIfNecessary(container);
}
}
}

protected MessageListenerContainer createListenerContainer(KafkaListenerEndpoint endpoint,
KafkaListenercContainerFactory<?> factory) {
//监听器被创建了
MessageListenerContainer listenerContainer = factory.createListenerContainer(endpoint);

if (listenerContainer instanceof InitializingBean) { //这时spring 容器已经初始化完成了,生命周期方法不会再执行了,这里显式调用它
try {
((InitializingBean) listenerContainer).afterPropertiesSet();
}
catch (Exception ex) {
throw new BeanInitializationException("Failed to initialize message listener container", ex);
}
}

int containerPhase = listenerContainer.getPhase();
if (listenerContainer.isAutoStartup() &&
containerPhase != AbstractMessageListenerContainer.DEFAULT_PHASE) { // a custom phase value
if (this.phase != AbstractMessageListenerContainer.DEFAULT_PHASE && this.phase != containerPhase) {
throw new IllegalStateException("Encountered phase mismatch between container "
+ "factory definitions: " + this.phase + " vs " + containerPhase);
}
this.phase = listenerContainer.getPhase();
}

return listenerContainer;
}


private void startIfNecessary(MessageListenerContainer listenerContainer) {
// contextRefreshed Spring 完全启动完成true
if (this.contextRefreshed || listenerContainer.isAutoStartup()) {
listenerContainer.start();
}
}

主要就是通过KafkaListenercContainerFactory 信息监听工厂来创建监听器MessageListenerContainer ,通过继承了SmartLifecycle。SmartLifecycle接口是Spring 在初始化完成后,根据接口isAutoStartup() 返回值是否实现该接口的类中对应的start()。Spring 当spring 完全初始化完成后,SmartLifecycle 接口就不会被Spring 调用执行,这时就需要手动执行start 方法,所以startIfNecessary 方法才会判断容器已经启动完成了。

MessageListenerContainer

1
2
3
4
5
6
7
8
9
10
11
12
13
14
15
16
public C createListenerContainer(KafkaListenerEndpoint endpoint) {
C instance = createContainerInstance(endpoint);
JavaUtils.INSTANCE
.acceptIfNotNull(endpoint.getId(), instance::setBeanName);
if (endpoint instanceof AbstractKafkaListenerEndpoint) {
//配置kafka 设置,因为像信息消费提交ack,信息消费批量这些设置都是通过配置设定的,这些信息都在factory保存着,这时将配置信息设置给endpoint
configureEndpoint((AbstractKafkaListenerEndpoint<K, V>) endpoint);
}
//这里是核心,将注解声明bean method 创建成MessagingMessageListenerAdapter 信息监听适配器,在将适配器初始化参数去创建信息监听器,交给instance
endpoint.setupListenerContainer(instance, this.messageConverter);
//将concurrency 并发数设置上
initializeContainer(instance, endpoint);
//自定义配置
customizeContainer(instance);
return instance;
}

这时kafka 配置信息、@KafkaListener 信息、消费方法、bean 已经全部设置createListenerContainer,这时监听器容器就可以启动kafka 拉取信息,调用方法进行处理了。

直接从信息监听器ConcurrentMessageListenerContainer启动方法开始

1
2
3
4
5
6
7
8
9
10
11
12
13
14
15
16
17
18
19
20
21
22
23
24
25
26
27
28
29
30
31
32
33
34
35
36
37
38
39
40
41
42
43
44
45
46
47
48
49
50
51
52
53
54
55
56
57
58
59
60
public final void start() {
checkGroupId();
synchronized (this.lifecycleMonitor) {
if (!isRunning()) { //监听状态,测试还没有开始监听,所以监听状态应该为false
Assert.state(this.containerProperties.getMessageListener() instanceof GenericMessageListener,
() -> "A " + GenericMessageListener.class.getName() + " implementation must be provided");
//抽象方法,由子类去实现
doStart();
}
}
}

@Override
protected void doStart() {
if (!isRunning()) {
//topic 正则匹配,根据规则去匹配sever所有topic,没有则抛出异常
checkTopics();
ContainerProperties containerProperties = getContainerProperties();
//已经获取到消费组的分区和offset
TopicPartitionOffset[] topicPartitions = containerProperties.getTopicPartitions();
if (topicPartitions != null && this.concurrency > topicPartitions.length) {
// 当 concurrency 并发数超过分区时,这里会打印警告日志
this.logger.warn(() -> "When specific partitions are provided, the concurrency must be less than or "
+ "equal to the number of partitions; reduced from " + this.concurrency + " to "
+ topicPartitions.length);
//注意这里,强制将并发数改成最大分数,在设置消费并发时,不用担心分区数量并发超过
this.concurrency = topicPartitions.length;
}
setRunning(true); //开始监听
//concurrency 就是创建容器时,从@KafkaListener 解析处理的并发数
// 可以看出并发数控制着 KafkaMessageListenerContainer 实例产生
for (int i = 0; i < this.concurrency; i++) {
//创建 KafkaMessageListenerContainer 对象
KafkaMessageListenerContainer<K, V> container =
constructContainer(containerProperties, topicPartitions, i);
//配置监听器容器拦截器、通知这些,如果没有配置默认都是null
configureChildContainer(i, container);
if (isPaused()) {
container.pause();
}
container.start(); //启动任务
//因为所有消费现场都是同一个容器创建的,当要停止某个消费topic,需要对containers进行操作
this.containers.add(container);
}
}
}

private KafkaMessageListenerContainer<K, V> constructContainer(ContainerProperties containerProperties,
@Nullable TopicPartitionOffset[] topicPartitions, int i) {

KafkaMessageListenerContainer<K, V> container;
if (topicPartitions == null) {
container = new KafkaMessageListenerContainer<>(this, this.consumerFactory, containerProperties); // NOSONAR
}
else { //如果存在分区,每一个消费都有平分分区
container = new KafkaMessageListenerContainer<>(this, this.consumerFactory, // NOSONAR
containerProperties, partitionSubset(containerProperties, i));
}
return container;
}

看到了@KafkaListener 并发数如何实现的,并且并发数不能超过分区数的,如果并发数小于分区数,则会出现平分的情况,可能会让一个消费占有多个分区情况。这里在创建KafkaMessageListenerContainer 去对Kafka topic 进行消费。

KafkaMessageListenerContainer

因为KafkaMessageListenerContainer和ConcurrentMessageListenerContainer都是通过extends AbstractMessageListenerContainer 重写doStart()开启任务,直接看见doStart就可以知道程序入口了。

1
2
3
4
5
6
7
8
9
10
11
12
13
14
15
16
17
18
19
20
21
22
23
24
25
26
27
28
29
30
31
32
33
34
35
36
37
38
39
40
41
42
43
44
45
46
47
48
49
50
51
52
53
54
55
56
57
58
59
60
61
62
63
	protected void doStart() {
if (isRunning()) {
return;
}
if (this.clientIdSuffix == null) { // stand-alone container
checkTopics();
}
ContainerProperties containerProperties = getContainerProperties();
//检查是否非自动ack,在org.springframework.kafka.listener.ContainerProperties.AckMode 有多种模式
checkAckMode(containerProperties);
//
Object = containerProperties.getMessageListener();
//任务执行器,看起俩像一个线程池Executor ,本质上是直接使用Thread来启动任务的
AsyncListenableTaskExecutor consumerExecutor = containerProperties.getConsumerTaskExecutor();
if (consumerExecutor == null) {
consumerExecutor = new SimpleAsyncTaskExecutor(
(getBeanName() == null ? "" : getBeanName()) + "-C-");
containerProperties.setConsumerTaskExecutor(consumerExecutor);
}
GenericMessageListener<?> listener = (GenericMessageListener<?>) messageListener;
//这个一个枚举类,根据类型生成type,type 标记着如何处理kafka 信息,有批量的、单条的、手动提交、自动提交
ListenerType listenerType = determineListenerType(listener);
//ListenerConsumer 内部类,有关Kafka 任何信息都可以直接去取的
this.listenerConsumer = new ListenerConsumer(listener, listenerType);
setRunning(true); //设置运行状态
this.startLatch = new CountDownLatch(1);
this.listenerConsumerFuture = consumerExecutor
.submitListenable(this.listenerConsumer);//启动线程
try {
if (!this.startLatch.await(containerProperties.getConsumerStartTimeout().toMillis(), TimeUnit.MILLISECONDS)) {
this.logger.error("Consumer thread failed to start - does the configured task executor "
+ "have enough threads to support all containers and concurrency?");
publishConsumerFailedToStart();
}
}
catch (@SuppressWarnings(UNUSED) InterruptedException e) {
Thread.currentThread().interrupt();
}
}
```
在这里主要逻辑就是启动线程去去处理kafka 信息拉取。我们直接去看ListenerConsumer run() 就行了。
```Java
@Override // NOSONAR complexity
public void run() {
ListenerUtils.setLogOnlyMetadata(this.containerProperties.isOnlyLogRecordMetadata());
//向spring容器发布事件
publishConsumerStartingEvent();
this.consumerThread = Thread.currentThread();
setupSeeks();
KafkaUtils.setConsumerGroupId(this.consumerGroupId);
this.count = 0;
this.last = System.currentTimeMillis();
//从kafka 获取消费组 分区 offset,保存起来
initAssignedPartitions();
//发布事件
publishConsumerStartedEvent();
Throwable exitThrowable = null;
while (isRunning()) {
try {
//核心 拉取信息和 调用方法去处理信息
pollAndInvoke();
}
//省略

pollAndInvoke 这个方法就是拉取信息和处理的过程了,方法太繁琐了,无非就是如何去调用endpoint 生成信息处理器,并且将参数注入方法中。

总结

OR0dOA.png
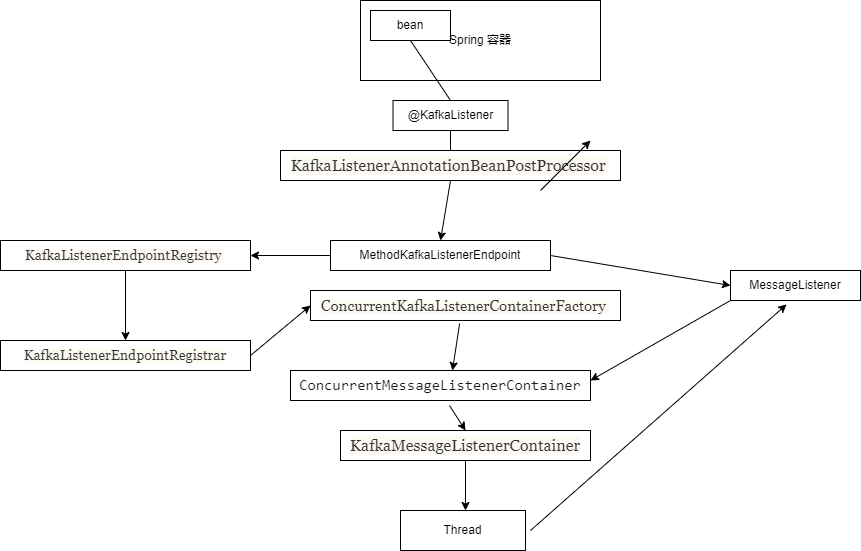
结合上面图,简单总结下Spring Kafka 如何通过一个简单注解实现对方法消费信息的。首先通过Spring 前置处理器机制使用KafkaListenerAnnotationBeanPostProcessor 扫描所有已经实例化的bean,找出带有@KafkaListener bean 和方法,解析注解的内容设置到MethodKafkaListenerEndpoint,并且注册到KafkaListenerEndpointRegistry,有它统一保存起来,等到执行前置处理器统一将KafkaListenerEndpointRegistry保存起来的enpoint,注册到KafkaListenerEndpointRegistrar,根据enpoint生成ConcurrentMessageListenerContainer,在根据并发数去生成对应数量的KafkaMessageListenerContainer,最后使用Thread 异步启动Kafka 信息拉去,调用bean 方法进行处理。
还理解了topic 分区和并发数如何关联的,还知道kafka消费是可控制的,处理Kafka信息方法,返回值可以被推送到另一个topic的、也是第一次知道有@RetryableTopic 重试机制,还有DLT 死信topic。如果不是看源码分析,平常工作场景估计很少用得上这些。现在看源码多了,越来越有感觉查看代码更能加深你对框架学习,心得。

动态订阅

看了这么多代码,对照处理器CV下就,简单版动态监听就可以实现了

1
2
3
4
5
6
7
8
9
10
11
12
13
14
15
16
17
18
19
20
21
22
23
24
25
26
27
28
29
30
31
@Component
public class ListenerMessageCommand<K,V> implements CommandLineRunner {

@Autowired
private Cusmotd cusmotd;

@Autowired
private KafkaListenerEndpointRegistry endpointRegistry;

@Autowired
private KafkaListenerContainerFactory<?> kafkaListenerContainerFactory;

private Logger logger = LoggerFactory.getLogger(ListenerMessageCommand.class);

@Override
public void run(String... args) throws Exception {
MethodKafkaListenerEndpoint<K, V> endpoint = new MethodKafkaListenerEndpoint<>();
endpoint.setBean(cusmotd);
Method method = ReflectionUtils.findMethod(cusmotd.getClass(), "dis", ConsumerRecord.class);
endpoint.setMethod(method);
endpoint.setMessageHandlerMethodFactory(new DefaultMessageHandlerMethodFactory());
endpoint.setId("tk.shengyifeng.custom#1");
endpoint.setGroupId("test");
endpoint.setTopicPartitions(new TopicPartitionOffset[0]);
endpoint.setTopics("skdsk");
endpoint.setClientIdPrefix("comuserd_");
endpoint.setConcurrency(1);
endpointRegistry.registerListenerContainer(endpoint,kafkaListenerContainerFactory,true);
logger.info("register...............");
}
}

我们看过完整代码,知道监听动作是由KafkaListenerContainerFactory创建后,调用实例start 方法开始的,并且我们还能拿到监听容器对象,可以调用对象各式API,可以动态停止对topic消费哦。

1
2
3
4
5
6
7
8
9
10
11
12
13
14
15
16
17
18
19
20
21
22
23
24
25
26
27
28
29
30
31
32
33
34
35
@RestController
@RequestMapping("kafka")
public class KafkaController<K,V> {
@Autowired
private Cusmotd cusmotd;

@Autowired
private KafkaListenerContainerFactory<?> kafkaListenerContainerFactory;

private Map<String,MessageListenerContainer> containerMap = new ConcurrentReferenceHashMap<>();

@GetMapping("start/topic")
public void startTopic(String topicName,String groupName){
MethodKafkaListenerEndpoint<K, V> endpoint = new MethodKafkaListenerEndpoint<>();
endpoint.setBean(cusmotd);
Method method = ReflectionUtils.findMethod(cusmotd.getClass(), "dis", ConsumerRecord.class);
endpoint.setMethod(method);
endpoint.setMessageHandlerMethodFactory(new DefaultMessageHandlerMethodFactory());
endpoint.setId("tk.shengyifeng.custom#1");
endpoint.setGroupId(groupName);
endpoint.setTopicPartitions(new TopicPartitionOffset[0]);
endpoint.setTopics(topicName);
endpoint.setClientIdPrefix("comuserd_");
endpoint.setConcurrency(1);
MessageListenerContainer listenerContainer = kafkaListenerContainerFactory.createListenerContainer(endpoint);
listenerContainer.start();
containerMap.put(topicName,listenerContainer);
}

@GetMapping("stop/topic")
public void stopTopic(String topicName){
if (containerMap.containsKey(topicName))
containerMap.get(topicName).stop();
}
}

这个简单http接口,通过接口方式支持对外扩容的方式动态订阅频道,并且支持已经订阅topic消费停下来。
使用@kafkaListener 声明方法消费的同学不用羡慕的,Spring 提供机制可以去获取MessageListenerContainer,上面代码分析我们知道了KafkaListenerEndpointRegistry内部的listenerContainers 会保存所有container实例,并且提供外部方法根据id去获取对象,而且KafkaListenerEndpointRegistry还是有spring 进行实例化的,所以….
为了方便获取id简单,可以在使用注解时,手动指定id 值,如果没有指定则id,默认生成规则是org.springframework.kafka.KafkaListenerEndpointContainer# + 自增长

SpringBoot 自动配置

大家可能好奇,Spring boot中Kafka配置信息如何给kafkaListenerContainerFactory,因为它是通过Spring 容器初始化的,源码中并没有看见带有构造器的参数注入。想要具体了解,只有看KafkaAnnotationDrivenConfiguration,ConcurrentKafkaListenerContainerFactoryConfigurer

1
2
3
4
5
6
7
8
9
10
11
12
13
14
15
16
17
18
19
20
21
22
23
24
25
26
27
28
29
30
31
32
33
34
35
36
37
38
39
40
41
42
43
44
45
46
47
48
49
@Configuration(proxyBeanMethods = false)
@ConditionalOnClass(EnableKafka.class)
class KafkaAnnotationDrivenConfiguration {

private final KafkaProperties properties;

private final RecordMessageConverter messageConverter;

private final RecordFilterStrategy<Object, Object> recordFilterStrategy;

private final BatchMessageConverter batchMessageConverter;

private final KafkaTemplate<Object, Object> kafkaTemplate;

private final KafkaAwareTransactionManager<Object, Object> transactionManager;

private final ConsumerAwareRebalanceListener rebalanceListener;

private final ErrorHandler errorHandler;

private final BatchErrorHandler batchErrorHandler;

private final AfterRollbackProcessor<Object, Object> afterRollbackProcessor;

private final RecordInterceptor<Object, Object> recordInterceptor;

KafkaAnnotationDrivenConfiguration(KafkaProperties properties,
ObjectProvider<RecordMessageConverter> messageConverter,
ObjectProvider<RecordFilterStrategy<Object, Object>> recordFilterStrategy,
ObjectProvider<BatchMessageConverter> batchMessageConverter,
ObjectProvider<KafkaTemplate<Object, Object>> kafkaTemplate,
ObjectProvider<KafkaAwareTransactionManager<Object, Object>> kafkaTransactionManager,
ObjectProvider<ConsumerAwareRebalanceListener> rebalanceListener, ObjectProvider<ErrorHandler> errorHandler,
ObjectProvider<BatchErrorHandler> batchErrorHandler,
ObjectProvider<AfterRollbackProcessor<Object, Object>> afterRollbackProcessor,
ObjectProvider<RecordInterceptor<Object, Object>> recordInterceptor) {
this.properties = properties;
this.messageConverter = messageConverter.getIfUnique();
this.recordFilterStrategy = recordFilterStrategy.getIfUnique();
this.batchMessageConverter = batchMessageConverter
.getIfUnique(() -> new BatchMessagingMessageConverter(this.messageConverter));
this.kafkaTemplate = kafkaTemplate.getIfUnique();
this.transactionManager = kafkaTransactionManager.getIfUnique();
this.rebalanceListener = rebalanceListener.getIfUnique();
this.errorHandler = errorHandler.getIfUnique();
this.batchErrorHandler = batchErrorHandler.getIfUnique();
this.afterRollbackProcessor = afterRollbackProcessor.getIfUnique();
this.recordInterceptor = recordInterceptor.getIfUnique();
}

作为其实Spring Boot自动配置原理就是由spring-boot-autoconfigure 包编码实现的,在根据@ConditionalOnClass 注解来决定是否启动配置类,所以当你引入对应pox时,就会启动配置类了,配置信息会注入到KafkaProperties对象中,然后将properties 设置到工厂对象,实例化对象交给spring 容器,你会发现大多数自动注入都是这样套路。